Thursday, September 27, 2012

Photoshop Color Replacement Tool

Photoshop Color Replacement Tool

Sometimes you want to replace certain colors in an image. With the Color Replacement tool – you can specify which colors you’d like to change and Photoshop will automatically replace them for you. This tutorial goes through the color replacement process and discusses all the things you need to know about the Color Replacement tool.
color replacement tool

 Some tools don’t get enough attention, this tool might be one of them. You could compare it somehow with the Healing Brush, although there is a difference. This tool works like a regular paint brush, it manipulates the color on your image while the underlying texture stays unaffected. Because of this, you can apply a color change in a more precision way.


If you select the tool in the Toolbox, you'll get to see the various options in the Options bar like different Modes to work with in which the Replace Color Tool can be applied: Hue, Saturation, Color and Luminosity. The Hue will apply the replacement in the most subtle way, while the Color mode might result is a far too vibrant effect.

Sampling determines the source for the color replacement. "Continuous" means you will be continuously sampling as you go. "Background Swatch" uses the background swatch as a pre-defined sample color. Only areas containing the current background color will be replaced. "Once" will replace the targeted color only in areas containing the color that you've first clicked.

You also have Limits options. "Contiguous" will replace colors that are contiguous with the color immediately under the pointer "Discontinuous" will replace the sample color under the pointer wherever you go. "Find Edges" will replace connected areas containing the sampled color while preserving the sharpness of the shape edges.

The Tolerance is a bit like with other tools, the higher the percentage the broader the range and the more colors will be replaced. Check the anti aliasing option to get softer edges, although it could give you a less precise result. You can use the "Find Edges" options to limit the anti aliasing.

The foreground color will be used as your new color that will replace the unwanted color.

BEFORE AND AFTER:

color replacement tool work


THIS IS WHAT I DID:

choose the "Once" option for the more dangerous areas and the "Continuous" for the safer areas

used the "Hue" mode for a more subtle replacement (the others will create pretty drastic results)

used the "Color" mode in combination with a less vibrant color to enhance the pink color of the shirt

used the "Background Swatch" sampling option to resolve the grey areas

color replacement hue, color, background swatch


Tuesday, September 25, 2012

Photoshop’s Painting Tools

Photoshop’s Painting Tools

Photoshop’s Painting tools allow you to draw and fill in objects with colors and color gradients. This tutorial showcases Photoshop’s painting capabilities.

In Photoshop, the painting tools are used to paint strokes, and fill areas with color or with colors that blend together. Knowing how to use the paint tools is a must for any artist who wishes to use Photoshop.

The Brush Tool
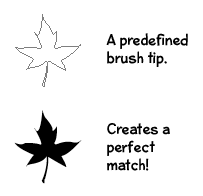
In order to use the brush tool to its full extent, it’s important to understand what exactly a brush is in Adobe Photoshop. A brush uses brush presets that are predefined (or user defined). A brush preset is any brush tip with defined characteristics (such as size and shape).


brush tool

Think of brushes in Photoshop as a large collection of different paintbrushes, each with a different shaped tip. Imagine when you press the tip of one of these paintbrushes against a canvas, the shape of the tip is imprinted immediately. It’s a rough explanation, but it gets the basic idea across.

Brushes in Photoshop have plenty of other characteristics which make them entirely unlike a real world paint brush. By manipulating these attributes, we can create entirely new brushes that act in unique ways. You could create a brush that changes in shape and size as you are painting, a brush that scatters itself in random directions, and even a brush that becomes more and less transparent while creating strokes. The possibilities are literally endless.

brush preset


Let’s Create a Quick Brush for demonstration purposes.

Create a new document, 200px by 200px with a white background. Select the Brush tool, and in the options bar select the first brush preset from the brush preset picker (activated by clicking on the small down arrow next to the current brush).

Go ahead and give this brush preset a whirl in your active image area. Select a foreground color you’d like to paint with, point your cursor to where you’d like to start painting, hold down the mouse button, and create a stroke.

Modifying Brushes

modifying brushes

This brush preset creates a 1px hard stroke. We can modify some of the characteristics of this brush to create something entirely different.

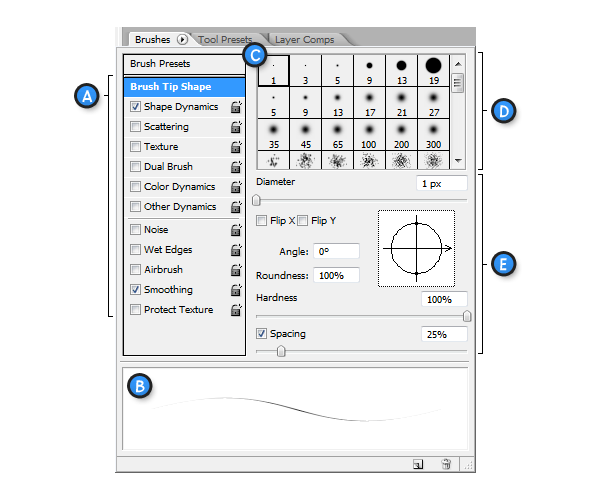
To modify a brush preset, you’re going to need to access the Brush Palette. To open the brush palette, go to Window > Brushes. Here’s a quick overview of the palette.

brush palette
A. Brush Settings – Various settings for the selected brush tip.
B. Brush Stroke Preview – A preview of the current brush stroke will look when used.

C. Selected Brush Tip – The currently selected brush tip.

D. Brush Tip Shapes – A list of all brush tip shapes available.

E. Brush Options – Options for modifying the currently selected brush tip. Changes will not be permanent unless a new brush preset is saved.

From the Brush Tip Shape settings, a user can select a brush tip shape from a list of available shapes (predefined or user defined).

By clicking any of the various brush settings on the left, a panel of options will be displayed that can adjusted to your own preference.

brush settings

In the Brush Tip Shape area, set the diameter of your brush to 20px. By changing the diameter, you affect the size of the brush.

brush tip shape

Now go to Shape Dynamics and set the size jitter option to 100%. By changing shape dynamics, you’re adjusting how a brush mark changes during a stroke.

shape dynamics


Finally, go to Scattering, and set scatter to 300% with a count of 1. Scattering will affect placement and number of brush marks.

Try painting with your brush now, and you ought to see a huge difference from when you first started! Modifying brushes is really that simple!

If you’re interested in learning more about brushes, then i'll upload my tutorial on it.

Eraser Tool

We’re not going to go into too much detail with the eraser tool, simply because you should already have a pretty good understanding of how it works. How so?

Well, like many other tools in Photoshop, the Eraser Tool uses brushes which effect the size, shape, and hardness of the tool. Essentially, the eraser tool is controlled in the exact same way as the brush tool, only it erases rather than paints.

Watch Out! If you’re erasing directly on the “Background” layer, you’ll leave the currently selected background color wherever you erase. Always be sure to set your background color before erasing from the Background layer.

Paint Bucket Tool

The Paint Bucket Tool is used for filling areas with solid colors. It can be used to fill selections with a selected foreground color, or fill areas that are similar in color to the part of an image that is clicked. To use the paint bucket tool, select a foreground color you’d like to paint with, and click anywhere in the active image area you’d like to fill.

paint bucket tool


Gradient Tool

The Gradient Tool is very similar to the paint bucket tool, in that it fills entire areas or selections with colors. However, rather than filling an area with a solid color, the Gradient Tool creates a series of colors than blend into one another.

When the gradient tool is selected, a preset gradient can be selected from the gradient picker in the options bar. A gradient can then be created in the active image area by clicking and holding the mouse button, and dragging in the direction you’d like the gradient to go. Release where you’d like the gradient to stop.

gradient tool


There are 5 different gradient styles which can be selected to create different effects. You can set them from the Options Bar.


gradient styles


Photoshop’s Pen Tool: The Comprehensive Guide

Photoshop’s Pen Tool: The Comprehensive Guide

The Pen Tool makes appearances across almost the entire Adobe product range. Its function and behavior varies depending on the application, but by mastering it youll find you work quicker, smoother and with better results. This guide will give you a comprehensive basis for working with the Pen Tool in Photoshop.

1. Functions

Pen tool : 
Click on the canvas to create paths with straight segments, click and drag to create paths with Bezier curves.
pen tool
Freehand Pen tool : 
Click on the canvas and drag to draw paths freely, as though using a brush.
freehand pen tool
Add Anchor Point tool :
Click on a path segment to add anchor point.
add anchor point
Delete Anchor Point tool : 
Click on anchor point to remove from path.
delete anchor pointConvert Point tool : 
Click on an anchor point and drag to create bezier handles where there were none, click on an anchor point with handles to a remove them.
convert point tool

2. Keyboard Shortcuts

P : Select Pen tool or Freeform Pen tool, depending on which was selected most recently

3. The Cursors

The Pen tool takes on different forms depending on what you’re doing when youre using it. Each one intuitively makes you aware of the action you are about to perform.
(Caps Lock to toggle between pointer and cross hair in some cases)


 Prepared to begin path

while midway through creating or editing a path

When mouse is pressed

Add an anchor point to path

Remove anchor point from path

When hovered over begin point of path; to close path

When hovered over endpoint of existing path; to continue path, or (if path is active) to edit that point

Prepared to convert existing anchor point


Freehand Pen Tool


Magnetic Freehand Pen Tool


Direct Selection Tool; Pen Tool with Command pressed


Path Selection Tool; Pen Tool with Command + Alt pressed


When hovered over canvas with Ctrl pressed; prepared for options menu


4. Secondary Mouse Controls (with path selected and Auto Add/Delete checked)

Pen tool hover over anchor point : changes to Delete anchor point tool
Pen tool hover over path segment : changes to Add anchor point tool


5. Keyboard Controls

Hold Ctrl and click on canvas. Opens up an options menu.

Hold Shift to constrain movements to 45°, 90°, 135° or 180° while creating or editing anchor points and handles.

Select anchor point with Direct selection tool and click Delete. Anchor and adjoining path segments are deleted leaving two paths.

Pen tool + Option (Alt): changes to Convert anchor point tool.

Pen tool + Option (Alt) while editing bezier curve: splits curve (unhinges handles).

Pen tool + Command whilst creating path: changes to Direct Selection tool allowing repositioning of previously drawn anchor points.


6. Options

The Options Bar (Window > Options), usually located at the top of your screen, provides the most important options for whichever tool is selected. This is also true of the Pen Tools and their options are outlined below:

Presets: Allows presets to be saved for whichever tool is selected. Define the options as discussed below and save as a Preset to quickly come back to those settings later.
presets


Shape Layers: while this is selected, paths created will contribute to a shape, visible within the Paths palette and within the Layers palette as a vector mask.
shape layers


Paths: while this is selected, paths created will contribute to a path, visible within the Paths palette.
paths

Fill Pixels: The third path type option, available while one of the shape tools is selected. While this is selected, paths created will become filled areas.

fill pixels

Pen Tool: Selects the Pen Tool.
pen tool


Freehand Pen Tool: Selects the Freehand Pen Tool.
freehand pen tool


Rubber Band: Available from within the Pen Options dropdown while the Pen Tool is selected. Rubber Band gives a visual of the path youre about to create, without you having the cursor pressed on the canvas.
rubber band

Curve fit: Available from within the Freehand Pen Options dropdown while the Freehand Pen Tool is selected. Value entered determines the accuracy to which bezier handles will be added to your freely drawn path. The higher the value, the more accurate your result will be. A value of between 0.5 and 10 pixels is required.
curve fit


Magnetic: Available from the Options bar and within the Freehand Pen Options dropdown while the Freehand Pen Tool is selected. When selected, paths drawn will magnetize to pixels. The Magnetic settings as shown below, determine the width of the area the path is prepared to jump across, the contrast of the pixels necessary to attract the path and the frequency of anchor points added to the path.
magnetic

Pen Pressure: Available from within the Freehand Pen Options dropdown while the Freehand Pen Tool is selected. When selected, the pressure applied to a graphics tablet (if youre using one) influences the pen width.
pen pressure


Auto Add/Delete: Available when the Pen Tool is selected; allows adding and removing of anchor points with the normal Pen Tool (see Secondary Mouse Controls).
auto add/delete


Pathfinder Tools: These allow addition, subtraction, intersection and exclusion of the paths you create.
pathfinder tools


Layer Style: Available when Shape Layer is selected; this applies layer styles to shapes on a new layer (if chain link is unselected) or to shapes on the current layer (if chain link is selected).
layer style


7. Other Shortcuts and Tips

(With path selected) Spacebar to give you access to the Hand tool. Move your screen without deselecting the path or changing tools.

Go to View > Snap To > Grid to allow precise creation of curves with the Pen Tool.


8. Best Practice Suggestions

Drag handles from the first anchor point when beginning a curved path.

Drag your handles around just one third of the curve youre creating for a smooth path.


Position anchor points on a curve where the paths begin to change direction, not in the middle of its curve.


Be sparing with your use of anchor points, fewer points = neater path.

Sunday, September 23, 2012

Retouch and Healing Tools


Retouch and Healing Tools

Photoshop offers a large selection of tools and features for retouching photographs and images. In this tutorial, you’ll learn how to use the common touch-up tools.

Spot Healing Brush Tool

The Spot Healing Brush is primarily used to quickly remove blemishes, imperfections or other unwanted elements from an image. To use it, paint over an imperfection you’d like to get rid of using a suitable brush (brushes can be selected and modified in the options bar). The Spot Healing Brush Tool will automatically try to repair the imperfection by sampling the surrounding area.


Careful!
 Although the Spot Healing brush can be a great tool for quick fixes, it’s not always guaranteed to work if the area surrounding the imperfection is busy. Generally speaking, the surrounding area should be an approximate match in color & texture to what you want to take place of the unwanted element in your image.


Healing Brush Tool

The Healing Brush Tool performs a similar function to the spot healing brush tool mentioned above. Instead of automatically trying to determine the lighting, shading, and texture from the surrounding area, the healing brush tool lets you manually select a source, and then paint over an imperfection. To select a source, hold alt and click the desired part of the image. Then paint over the area you wish to replace. As with the Spot Healing Brush Tool, settings such as brush size can be controlled in the options bar.


Patch Tool

With the Patch Tool, an entire area can be repaired with pixels from another area. Just like the healing brush tool, the patch tool will try to correct lighting, shading, and texture. To use the patch tool, first draw a selection with any of the selection tools (or the patch tool, which will function as a lasso tool). Then, using the patch tooldrag that selectionover the destination you want to use to repair that area.


Clone Stamp Tool

The final tool we’ll cover in this tutorial is called the Clone Stamp Tool. The Clone stamp tool allows you to paint with a sample of an image.

Keep in mind that you are not healing/repairing an image when you use the Clone Stamp Tool. Therefore, lighting and shading will not be maintained when you paint over an area. What you see is literally what you get when you paint from a given source, making it very useful in certain situations.

Blur & Sharpen Tools

The Blur and Sharpen Tools allow us to manipulate edges by making them softer or harder. They do exactly what you would expect them to do; blur and sharpen.
Both tools have similar attributes such as Strength (increase or decrease the strength of the tool, or how much it will blur) and the brush, all of which can be adjusted in the Options Bar for each tool. To use the blur or sharpen tool, simply set up the brush to your specification, hold down the mouse button, and hover over the areas you’d like to alter in your image.

You should have a pretty good feel of the basic retouching tools by now. The next step in mastering Photoshop is usually learning how to use the painting tools to compliment your photo remastering abilities!