Photoshop’s Painting Tools
Photoshop’s Painting tools allow you to draw and fill in objects with colors and color gradients. This tutorial showcases Photoshop’s painting capabilities.In Photoshop, the painting tools are used to paint strokes, and fill areas with color or with colors that blend together. Knowing how to use the paint tools is a must for any artist who wishes to use Photoshop.
The Brush Tool
In order to use the brush tool to its full extent, it’s important to understand what exactly a brush is in Adobe Photoshop. A brush uses brush presets that are predefined (or user defined). A brush preset is any brush tip with defined characteristics (such as size and shape).

Think of brushes in Photoshop as a large collection of different paintbrushes, each with a different shaped tip. Imagine when you press the tip of one of these paintbrushes against a canvas, the shape of the tip is imprinted immediately. It’s a rough explanation, but it gets the basic idea across.
Brushes in Photoshop have plenty of other characteristics which make them entirely unlike a real world paint brush. By manipulating these attributes, we can create entirely new brushes that act in unique ways. You could create a brush that changes in shape and size as you are painting, a brush that scatters itself in random directions, and even a brush that becomes more and less transparent while creating strokes. The possibilities are literally endless.
Let’s Create a Quick Brush for demonstration purposes.
Create a new document, 200px by 200px with a white background. Select the Brush tool, and in the options bar select the first brush preset from the brush preset picker (activated by clicking on the small down arrow next to the current brush).
Go ahead and give this brush preset a whirl in your active image area. Select a foreground color you’d like to paint with, point your cursor to where you’d like to start painting, hold down the mouse button, and create a stroke.
Modifying Brushes
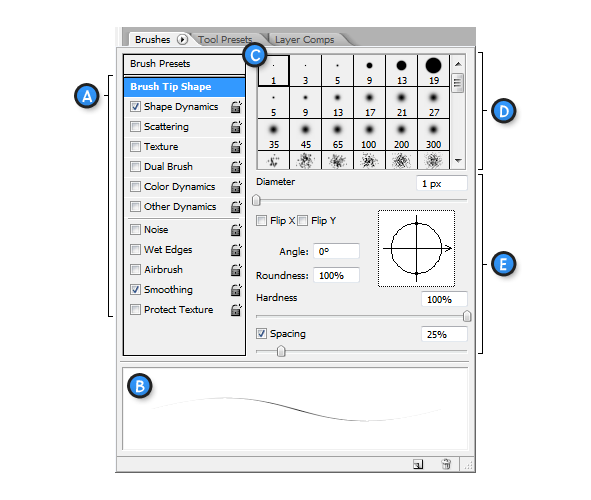
This brush preset creates a 1px hard stroke. We can modify some of the characteristics of this brush to create something entirely different.To modify a brush preset, you’re going to need to access the Brush Palette. To open the brush palette, go to Window > Brushes. Here’s a quick overview of the palette.
A. Brush Settings – Various settings for the selected brush tip.
B. Brush Stroke Preview – A preview of the current brush stroke will look when used.
C. Selected Brush Tip – The currently selected brush tip.
D. Brush Tip Shapes – A list of all brush tip shapes available.
E. Brush Options – Options for modifying the currently selected brush tip. Changes will not be permanent unless a new brush preset is saved.
From the Brush Tip Shape settings, a user can select a brush tip shape from a list of available shapes (predefined or user defined).
By clicking any of the various brush settings on the left, a panel of options will be displayed that can adjusted to your own preference.
In the Brush Tip Shape area, set the diameter of your brush to 20px. By changing the diameter, you affect the size of the brush.
Now go to Shape Dynamics and set the size jitter option to 100%. By changing shape dynamics, you’re adjusting how a brush mark changes during a stroke.
Finally, go to Scattering, and set scatter to 300% with a count of 1. Scattering will affect placement and number of brush marks.
Try painting with your brush now, and you ought to see a huge difference from when you first started! Modifying brushes is really that simple!
If you’re interested in learning more about brushes, then i'll upload my tutorial on it.
Eraser Tool
We’re not going to go into too much detail with the eraser tool, simply because you should already have a pretty good understanding of how it works. How so?Well, like many other tools in Photoshop, the Eraser Tool uses brushes which effect the size, shape, and hardness of the tool. Essentially, the eraser tool is controlled in the exact same way as the brush tool, only it erases rather than paints.
Watch Out! If you’re erasing directly on the “Background” layer, you’ll leave the currently selected background color wherever you erase. Always be sure to set your background color before erasing from the Background layer.
Paint Bucket Tool
The Paint Bucket Tool is used for filling areas with solid colors. It can be used to fill selections with a selected foreground color, or fill areas that are similar in color to the part of an image that is clicked. To use the paint bucket tool, select a foreground color you’d like to paint with, and click anywhere in the active image area you’d like to fill.Gradient Tool
The Gradient Tool is very similar to the paint bucket tool, in that it fills entire areas or selections with colors. However, rather than filling an area with a solid color, the Gradient Tool creates a series of colors than blend into one another.When the gradient tool is selected, a preset gradient can be selected from the gradient picker in the options bar. A gradient can then be created in the active image area by clicking and holding the mouse button, and dragging in the direction you’d like the gradient to go. Release where you’d like the gradient to stop.
There are 5 different gradient styles which can be selected to create different effects. You can set them from the Options Bar.


No comments:
Post a Comment